DevTunnel – A Reverse Proxy Tunnel
I wanted to have the option to run a web-application on my local machine, and make it seem as if it is running as part of a collection of web-applications on a remote cluster. The collection of web-applications on the cluster make up the whole of a web-site, and during development you might want to “replace” one of the web-app’s by a version on your own machine, which is under development. Note: where this story mentions web-app or web-proxy, you can also replace that by rest-service and api-gateway. It will be usable for those also…
For code and more information, see GitHub project: https://github.com/atkaper/devtunnel
As our clusters have no way of talking to a developer laptop, due to firewalls and VPNs which are in between them, I needed a setup with a reverse tunnel.

To setup a reverse tunnel, you need a server component running in the cluster, and you need a client application which starts a connection to the server, to ask for reverse traffic to be send to the client.
If you search the internet, you will find multiple tools which can do this. I thought it was a nice challenge to see if I could create (program) such a tool myself, and have the next set of requirements in it:
- Have a client component written for Node-JS. As that is the runtime engine for all of our front-end developers. They do not want (or can not) always install things like java or docker.
- Have the tunnel server (and client) automatically choose suitable server port numbers to use, without having to manually assign and setup ports to use for each developer.
- Try building this as layer-7 network components, e.g. parsing and understanding the HTTP/1.1 requests going via the tunnel (no support for HTTP/2+). This allows me to add tracing and debugging headers to the tunnel requests and log files. If you would use a lower level reverse tunnel, you loose the option to debug and tag the traffic.
It took me some days to build my tunnel (server in java + spring-boot, client for Node-JS), and debug / fix the issues in it, but I finally made it 😉
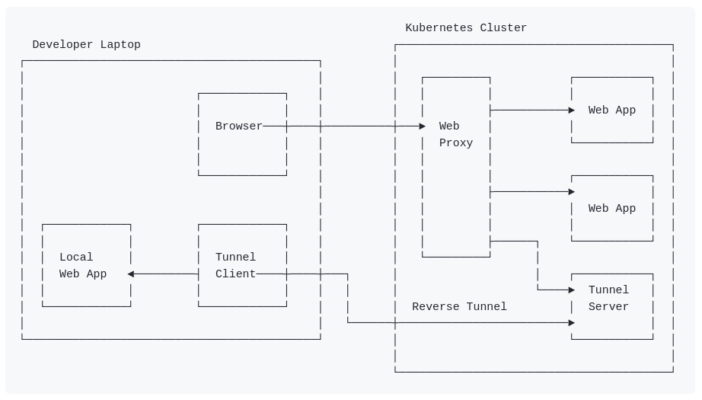
See image at the top of this page. The next set of points explains it in some more detail:
- The developer runs a local web application, which becomes (or takes over) a part of the test website.
- The browser on the developer machine talks to the web proxy on the Kubernetes (test) cluster.
- The web proxy on that cluster has rules to know to which web-app to send the traffic to.
- One (or more) of the web-apps can be simulated by the tunnel-server.
- The tunnel-client on the developer laptop is talking to the tunnel-server (using long-poll HTTP requests).
- When a request from the browser, via the web proxy enters the tunnel server, it will be passed back to the tunnel client, and will be sent to the local web-app on the developer machine.
- The response from the local web-app will go back via the tunnel client to the tunnel-server, and will be presented as response back to the browser (via the web proxy).
The underlying idea of how the tunnel functions is simple, but the implementation was a bit more complex.
- What happens is that the tunnel client uses a long-poll request to “wait” for data sent to the tunnel-server by a web browser.
- The HTTP-request data which is sent by the web browser to the tunnel-server is then passed back as response of the long-poll request. The request from the tunnel-client is used “backwards”.
- For the step above, the tunnel-server assigns a unique request-id to this step. We need this, because we need to have a way to send a response later (which is a separate / new call!), and connect it to the proper original web browser request as it’s response.
- The original web browser request stays in a paused / waiting state in the tunnel-server.
- The tunnel-client did receive the web browser request as response of the long-poll, and will open a connection to the local web-app target port.
- The request is sent to that local web-app.
- The response from the local web-app, is bundled with the request-id, and send as POST to the tunnel-server. This way the app-response is in the POST request body. Using this also in a “backwards” way.
- The tunnel-server will see the POST with the response for the web-browser as the request body of the POST. It uses the request-id which is also passed here, to find the paused / waiting web browser request socket. And passes the data back to is as response.
- As last step, the POST from the tunnel-server is put on hold, and it will wait as a new long-poll for a new request from the web-browser.
- This goes on in an endless loop.
In summary, the tunnel-client uses request and response bodies “backwards” (reverse), and out of step (e.g. the request and response are done in separate calls), and uses request-id’s which are generated by the tunnel-server to let the server know which post belongs to which request.
Even reading this summary makes your head hurt 😉 The implementation is much more complex, as it has to handle timeouts, errors, registration, port allocations, open up server ports, start listening threads, handle reporting, and more… And I’m not a Node-JS programmer, so I also had to do some searches to find out how to do networking in there. Just have a look at the code if you like to know how this works internally. The client looks a bit simpler than the server.
If you want to use this tunnel, have a look at the README.md in the project. Note: this does assume that you have knowledge about Java, Spring-Boot, Node-JS, Kubernetes, Docker, and networking. It is probably not documented well enough for others yet.
Closing Thoughts:
Status: this is just a proof-of-concept. I only tested it on my local machine for now. I will give this a try at work, and see if it suits our needs.
I might update this post (and the GitHub project) when we tried using this for a while. I plan to add some Kubernetes deployment example YML files, and add some feedback of how usable this tunnel is, or if we abandoned it.
At least this was a nice project to dig in to, and to learn some more of the deeper details of parsing and tunneling HTTP/1.1 traffic. And to get to know the Node-JS network functions.
Thijs, November 6. 2022.