
Kubernetes: Isolate Crashed Pod
Introduction
If you are running your pod (services / containers) on a Kubernetes cluster, and the pod runs into problems, you can decide to take it out of the load, but keep the pod running for further investigations.
TL;DR;
See the notes section on this site for the short summary; Note: Kubernetes Isolate Crashed Pod
Kubernetes Recap
Lets start with a summary of the Kubernetes components which are involved, here is a small (simplified) recap of how the parts fit together:
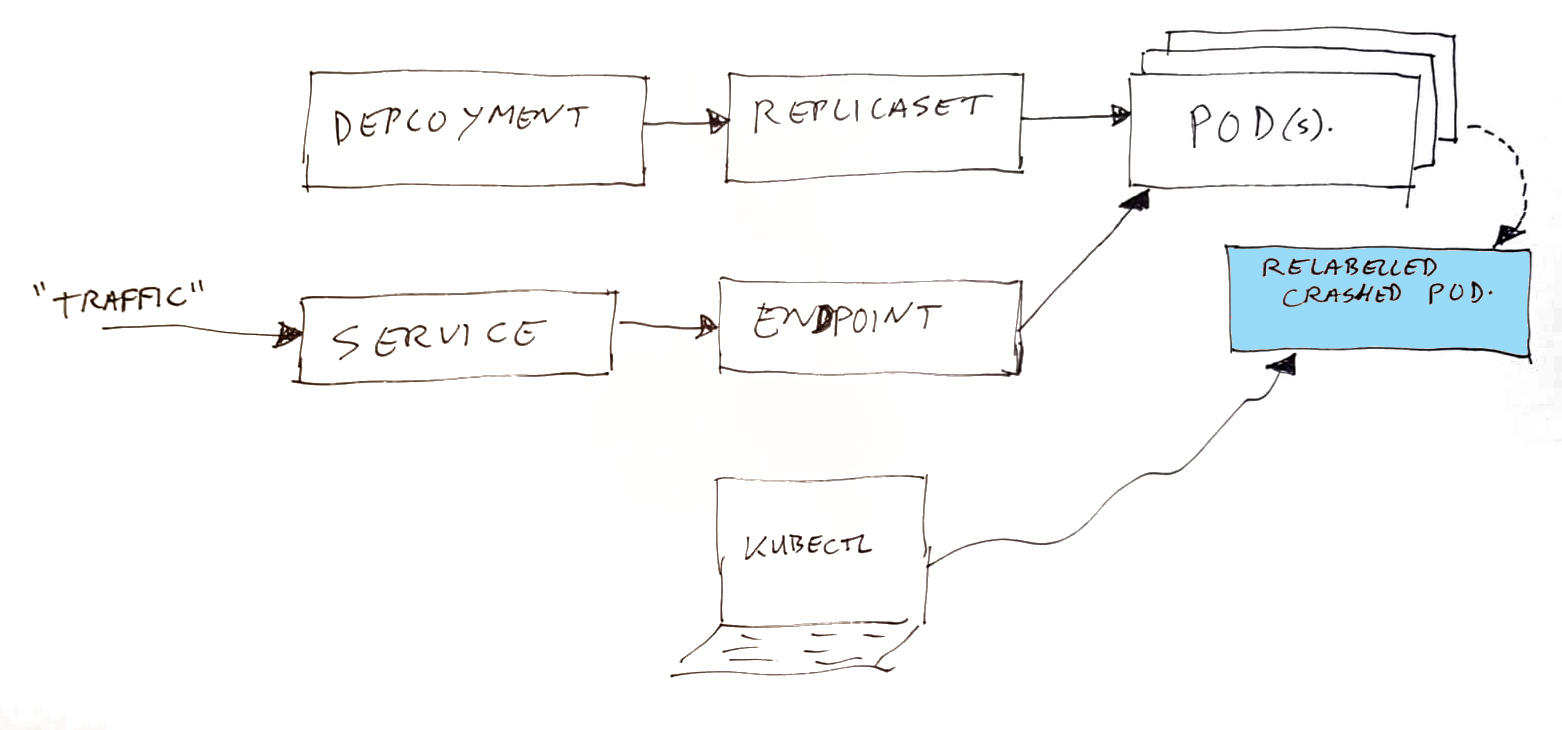
- Deployment – this is where YOU define your application container, and set how many instances you want to run.
- Replicaset – this is created automatically by Kubernetes as result of your Deployment. The replicaset is the thing which does get your pod’s started. It will monitor how many are running, and if a pod disappears (exits) it will start a new one. The connection between the replicaset and the pods is going via the pod selector labels.
- Service – this is where YOU define the entry of your traffic (which ports), and where they should go to. The destination is configured using pod selector labels.
- Endpoint – this is created by Kubernetes, based on what is in the service, and which pods can be found. It uses the pod selector labels to do that. In the endpoint, a list of IP addresses of destination pods is collected.
- Pods – these are created by Kubernetes, based on what is coming from the replicaset.
As mentioned before; the above is a simplified image. In real life, there are additional components, monitoring state, and reading configurations to get to the desired state. Some of the shown objects above are nothing more than yaml (data) definitions, serving as input for the not mentioned components. Traffic will not run through your service and endpoint, it goes to the pod’s via a service IP and with some clever network loadbalancing, which is configured using the information in the endpoint. A local DNS entry is made with the name and IP of your service.
Note: the source of your traffic normally comes from one (or both) of two spots; either from other pods in the system (they can talk to the service, by using for example http://yourservicename/…), or it can come from an ingress-nginx container which does receive requests from the outside of the cluster.
Disclaimer: I mix the words pod and container quite some times in this story. For the purists, they are not the same. A pod can contain multiple containers (like peas in a pod). It is just that in my example case, the pod had only one container.
The simple theory
By changing one of the pod selector labels of a running pod, two things will happen:
- The “service” definition will not “see” the pod anymore, and will get the “endpoint” data updated by removing the pod from the IP list.
- The “replicaset” will also not “see” the pod anymore (sort of assumes it did stop), and will start a fresh instance of the application for you in a new pod.
Effectively this has moved the pod out of the set of loadbalanced pods. It will not receive any “normal” traffic anymore, but of course you can still use kubectl to talk to that broken pod. The broken pod’s lifecycle management is also gone by this update, so it will not be cleaned up automatically.
Detailed Example
Here is an example, we are running on a cluster called “ah-tst” with namespace “ah”, and there is this pod which has an out-of-memory issue. I want to look at the memory details in that container (create a java heapdump). And possibly execute some isolated calls to the broken container, or use other tools on it. But first I want to get all traffic going again quickly. And after that, I can take my time looking at the broken one.
So we need to make sure no traffic flows to the container anymore, and a new one will take over it’s role.
Find the fully qualified pod name
Step one is finding the exact name of your pod, when you do know the base-name (if you already know this full name, for example from some log file / Kibana, you can skip this step) – in this example we had only one copy of the pod running:
$ kubectl --context=ah-tst get pods -n ah | grep -e NAME -e login-audit-trail-service

NAME                                                              READY   STATUS                       RESTARTS   AGE
login-audit-trail-service-b6bdb4645-274np                         1/1     Running                      0          23d
Code language: Bash (bash)
Showing some proof of my pod with issues (you can skip this step also):
$ kubectl --context=ah-tst logs -n ah --tail=16 login-audit-trail-service-b6bdb4645-274np

Exception in thread "DefaultDispatcher-worker-1" java.lang.OutOfMemoryError: unable to create native thread: possibly out of memory or process/resource limits reached
	at java.base/java.lang.Thread.start0(Native Method)
	at java.base/java.lang.Thread.start(Unknown Source)
	at kotlinx.coroutines.DefaultExecutor.createThreadSync(DefaultExecutor.kt:99)
	at kotlinx.coroutines.DefaultExecutor.getThread(DefaultExecutor.kt:34)
	at kotlinx.coroutines.EventLoopImplPlatform.unpark(EventLoop.kt:11)
	at kotlinx.coroutines.EventLoopImplBase.schedule(EventLoop.common.kt:361)
	at kotlinx.coroutines.EventLoopImplBase.scheduleResumeAfterDelay(EventLoop.common.kt:235)
	at kotlinx.coroutines.DelayKt.delay(Delay.kt:121)
	at io.ktor.client.features.HttpTimeout$Feature$install$1$1$killer$1.invokeSuspend(HttpTimeout.kt:148)
	at kotlin.coroutines.jvm.internal.BaseContinuationImpl.resumeWith(ContinuationImpl.kt:33)
	at kotlinx.coroutines.DispatchedTask.run(DispatchedTask.kt:106)
	at kotlinx.coroutines.scheduling.CoroutineScheduler.runSafely(CoroutineScheduler.kt:571)
	at kotlinx.coroutines.scheduling.CoroutineScheduler$Worker.executeTask(CoroutineScheduler.kt:750)
	at kotlinx.coroutines.scheduling.CoroutineScheduler$Worker.runWorker(CoroutineScheduler.kt:678)
	at kotlinx.coroutines.scheduling.CoroutineScheduler$Worker.run(CoroutineScheduler.kt:665)
Code language: Bash (bash)
A nasty out-of-memory issue. Every request we do ends up in a message like that.
Note: if you are running more than one instance of an application, it is of course important that you find out which one of the instances is the broken one, and continue the steps using the pod name of that broken instance. Normally you will find that information in your log stack (we use Elastic/Kibana).
Find the pod selector labels
Now for the real steps…
Find out what labels are used by the Kubernetes service object to point to your pod (for this you need your service name or deployment name – in our environment that is the same as the pod name but without the hex codes at the end):
$ kubectl --context=ah-tst get svc -n ah login-audit-trail-service -o wide

NAME                        TYPE        CLUSTER-IP   EXTERNAL-IP   PORT(S)   AGE    SELECTOR
login-audit-trail-service   ClusterIP   10.0.209.2   <none>        80/TCP    272d   component=api-springboot,release=login-audit-trail-service
Code language: Bash (bash)
This shows that this service uses two labels; “component” and “release“. If traffic is sent to the service object, it will search for pods which have both those exact labels.
You can also find this information by looking at the service yaml:
$ kubectl --context=ah-tst get svc -n ah login-audit-trail-service -o yamlCode language: Bash (bash)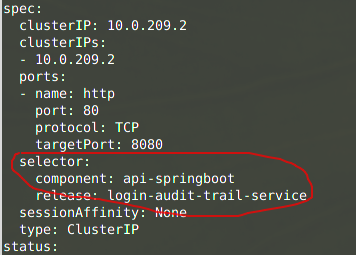
Or using something like this (using JQ command line tool):
$ kubectl --context=ah-tst get svc -n ah login-audit-trail-service -o json | jq .spec.selector

{
  "component": "api-springboot",
  "release": "login-audit-trail-service"
}Code language: Bash (bash)
Or find this information in your deployment yaml;
$ kubectl --context=ah-tst get deploy -n ah login-audit-trail-service -o yamlCode language: Bash (bash)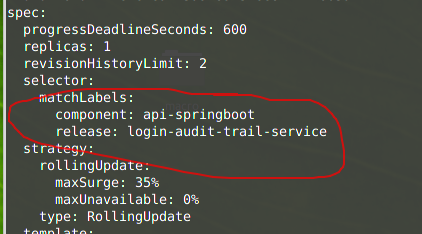
Or in one go by getting all fancy again:
$ kubectl --context=ah-tst get deploy -n ah login-audit-trail-service -o json \
  | jq .spec.selector

{
  "matchLabels": {
    "component": "api-springboot",
    "release": "login-audit-trail-service"
  }
}Code language: Bash (bash)
The pod itself does not know what it’s selector labels are. It only knows what all of it’s labels are.
Update one of the pod selector labels
To take the broken pod out of the load, we will change one of these labels on the running pod, which makes sure that the service object will not find it anymore, and stop routing traffic to it:
$ kubectl --context=ah-tst label -n ah --overwrite \
  pods login-audit-trail-service-b6bdb4645-274np release=crashed-login-audit-trail-service
Code language: Bash (bash)
The above command will update the “release” label. I chose to prefix the existing value with “crashed-“. You can also update all selector labels if you want.
Check pod states
What will happen now, is that the Kubernetes replicaset will detect that one of the pods is taken out of the load. And it will start a new one (with the correct labels) to take over. So after a while you see something like this:
$ kubectl --context=ah-tst get pods -n ah -o wide \
  | grep --color -e NAME -e login-audit-trail-service

NAME                                                              READY   STATUS                       RESTARTS   AGE     IP              NODE                              NOMINATED NODE   READINESS GATES
login-audit-trail-service-b6bdb4645-274np                         1/1     Running                      0          23d     172.16.26.65    aks-rancher-29569480-vmss00019h   <none>           <none>
login-audit-trail-service-b6bdb4645-l7fdz                         1/1     Running                      0          10m     172.16.31.52    aks-rancher-29569480-vmss0001gs   <none>           <none>
Code language: Bash (bash)
Where the *-274np one is the crashed pod, not reachable anymore, and the *-l7fdz is the new one, which is used from the Kubernetes service.
You can verify that by asking for the endpoint details:
$ kubectl --context=ah-tst get ep -n ah login-audit-trail-service

NAME                        ENDPOINTS           AGE
login-audit-trail-service   172.16.31.52:8080   272dCode language: Bash (bash)
You can see in the above output that traffic will be forwarded to pod IP 172.16.31.52, which is our new pod.
Keep in mind that the crashed pod is no longer under control of the replicaset, so it will NOT be removed automatically. You do need to remember to delete that pod manually after you finish your investigations.
That’s it! Now you are free to investigate the old pod, without anyone having any problems.
Trouble shooting
So what now?
- Use
kubectl execto open a shell or some other tool inside the pod (if available). - Use
kubectl port-forwardto proxy your own test traffic (curl?) to the crashed pod. - Use
kubectl debug(if enabled!) to connect in other ways with the pod if needed (for example if you want to look at network layer) – take care only to use debug options which do not restart the pod. - Use some other tools like for example Dynatrace to look at the pod state.
- …?
But the actual debugging is out of scope for this blog. Perhaps some other blog / time 😉
Cleaning up afterwards
To delete the broken pod later:
$ kubectl --context=ah-tst delete -n ah pod login-audit-trail-service-b6bdb4645-274npCode language: Bash (bash)Conclusion
It is quite common when you have production issues, that in a sort of “panic” (or just sense of rush – managers breathing in your neck) people start killing broken pods, to follow the old way of fixing things: “Have you tried turning it off and on again?”. Of course that will work fine in many cases, but you do loose the opportunity to find out the underlying root cause of why the pod got broken.
The relabel “trick” (well, it’s not really a trick – just works as designed) shown in this post might help you out here. You are able to immediately get traffic flowing again to a new instance of the pod, and at the same time you keep the broken (unused) one to study later.
Please do keep in mind that some pods might have “cron timer threads” in them, starting batch like functions. If these interfere with your system, then you might want to keep investigation time short anyway.
And do not forget to manually delete the pod when done.
The one command to remember from this post is:
kubectl --context=YOURCONTEXT label -n NAMESPACE \
  --overwrite pods FULL-POD-NAME somelabel=crashed-OLD-LABEL-VALUECode language: Bash (bash)
Or even shorter:
kubectl help labelCode language: Bash (bash)Thijs, January 19, 2022.
2 thoughts on “Kubernetes: Isolate Crashed Pod”
Nice explanation – very useful!
Thanks!