
Micro-services Architecture with Oauth2 and JWT – Part 4 – Oauth2/Scopes
The last number of years I have been working in the area of migrating from legacy monolith (web) applications to a (micro) service oriented architecture (in my role of Java / DevOps / Infrastructure engineer). As this is too big of a subject to put in a single blog post, I will split this in 6 parts; (1) Overview, (2) Gateway, (3) Identity Provider, (4) Oauth2/Scopes, (5) Migrating from Legacy, (6) Oauth2 and Web.
Introduction
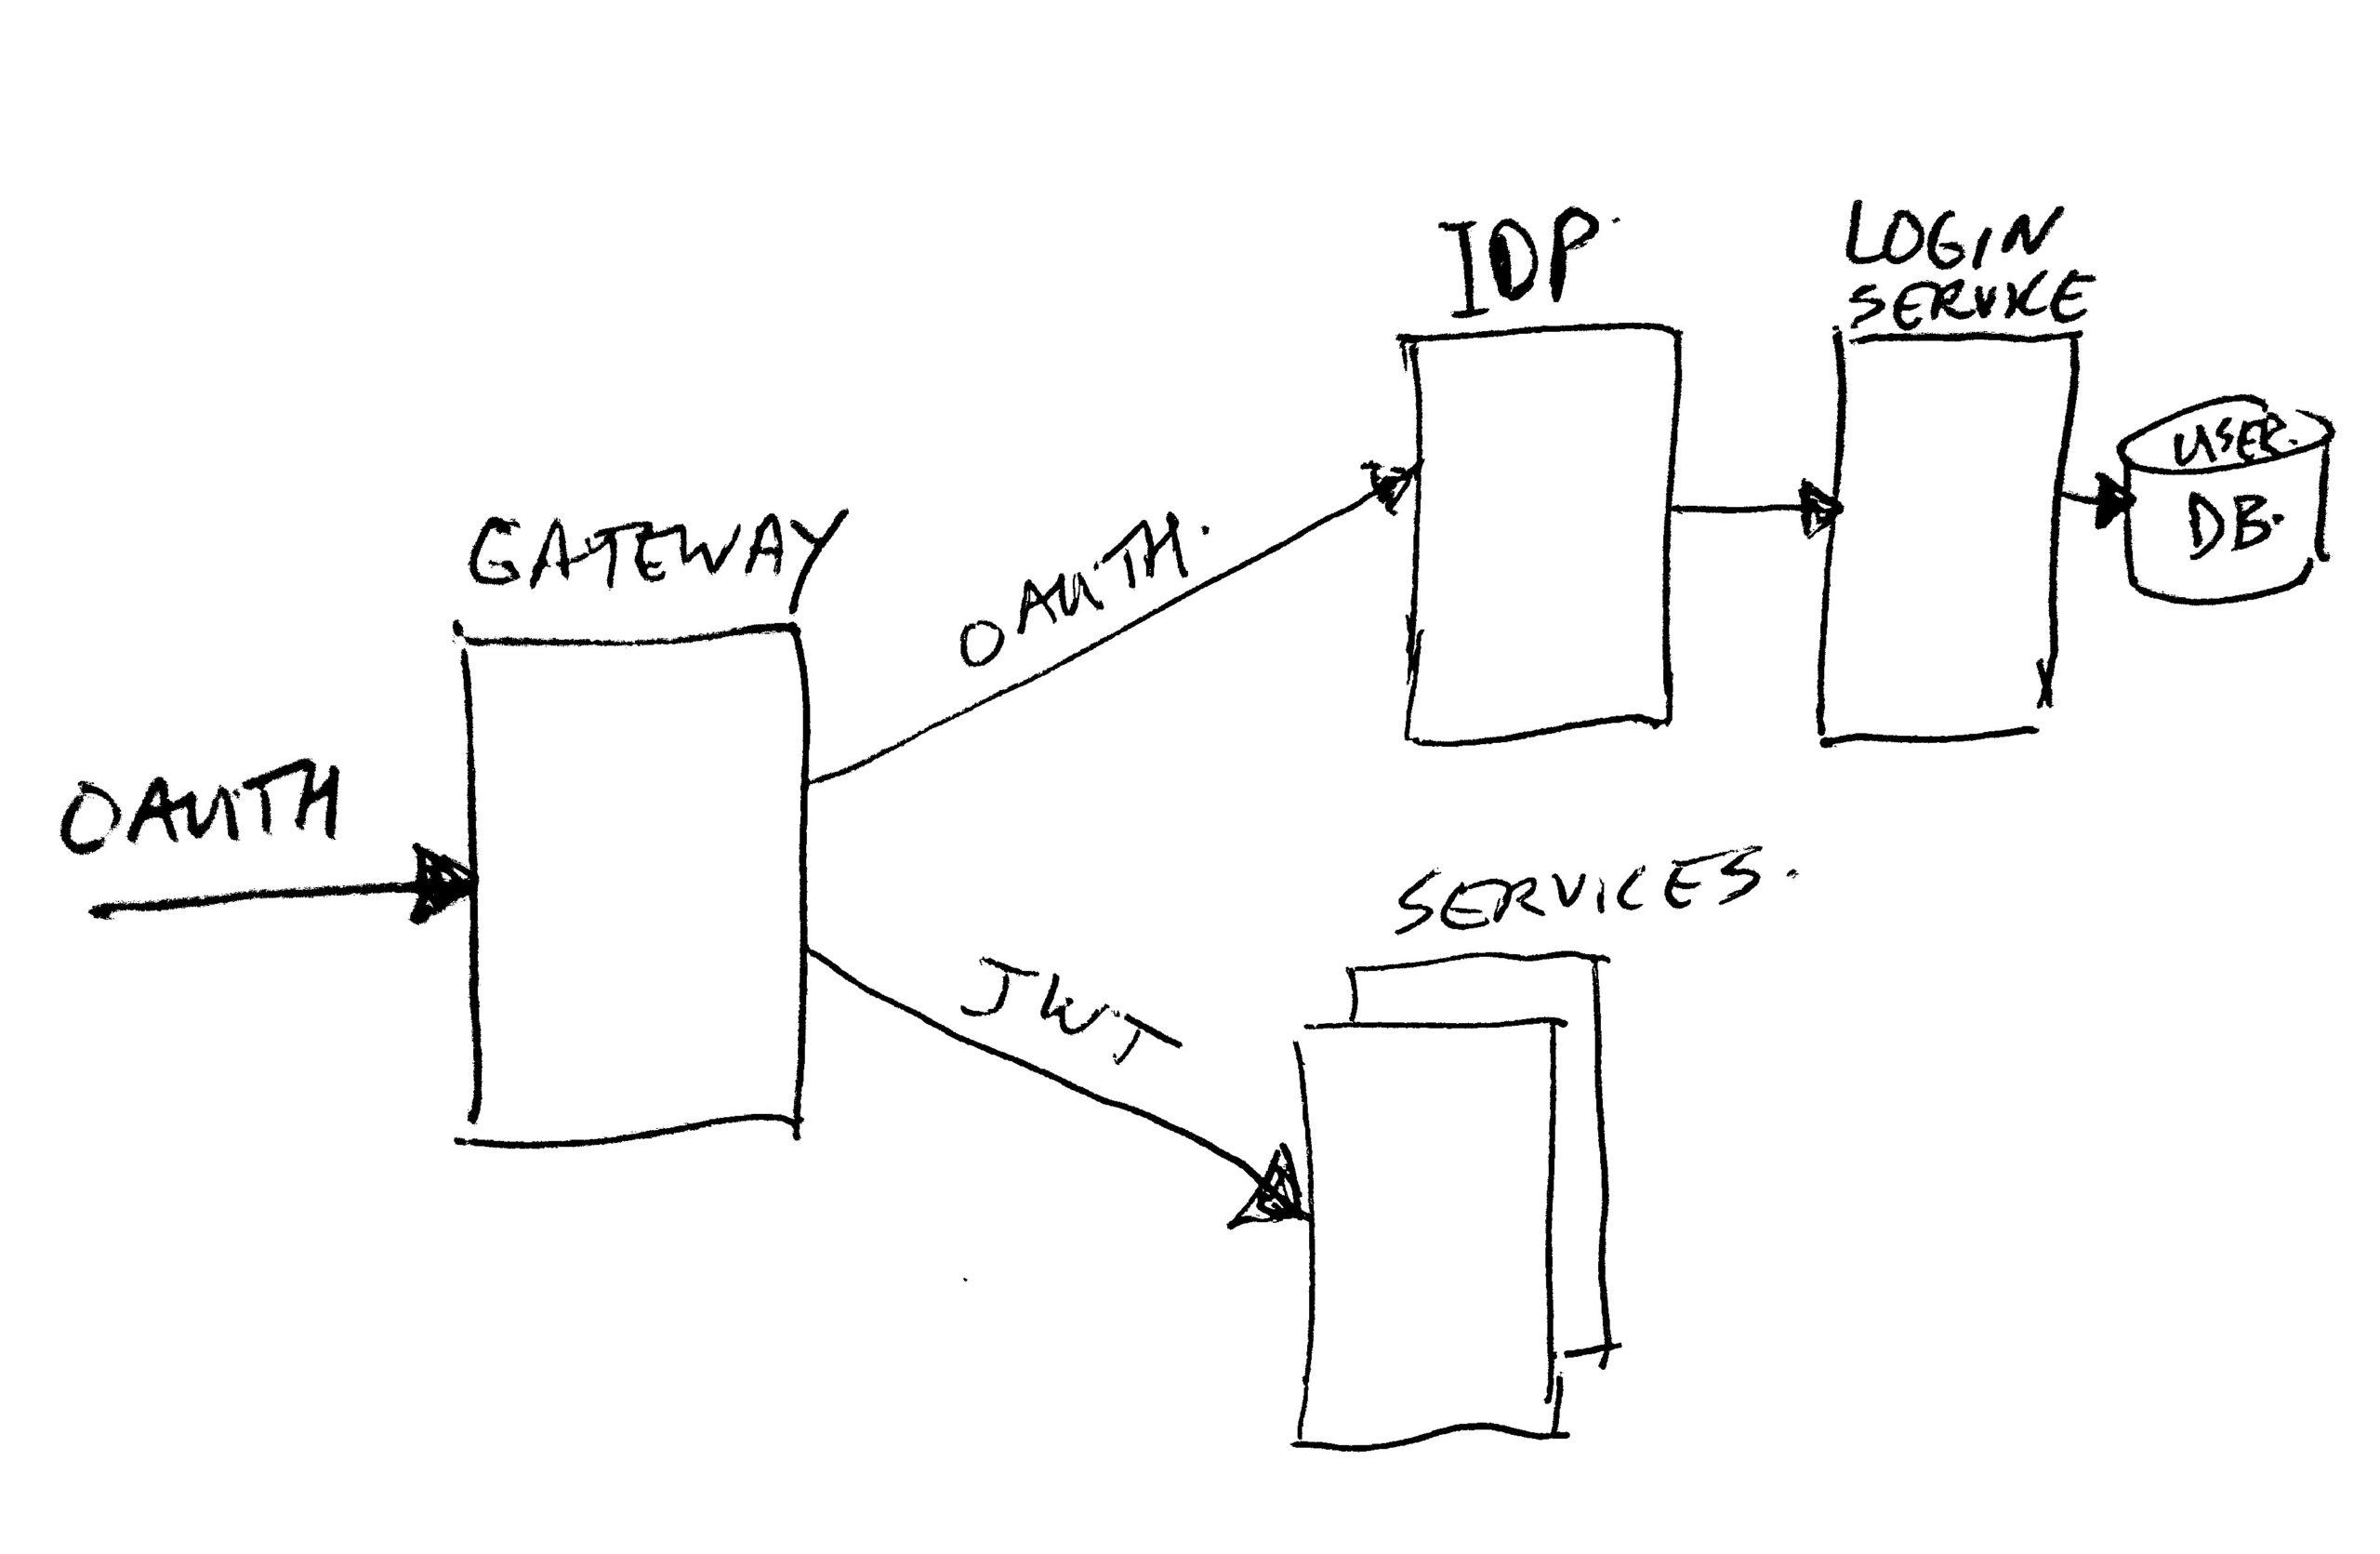
Recap: In the previous articles we have seen where the gateway and IDP (Identity Provider) fit in the architecture image. Traffic comes in via the gateway, and each request needs to have a valid Oauth2 access token to be able to talk to domain services. The gateway receives such a token, and asks the IDP if it is still valid. It also gets some more context (for example user information) to pass on to the services in the form of a JWT (Json Web Token). One other part of this token context is the scopes assigned to the token. The gateway uses those scopes to determine if a specific service may or may not be called by this user. If the service is allowed to be called, the gateway passes on the full token context in the JWT. The service then can use the context to see which user this is about, and what he/she may do by looking in more detail at the scopes.
This post will go into more detail on what Oauth2 is, how to request different types of tokens and how to keep them fresh. Scopes are an integral part of the token context, simply seen they are just simple tags (or names / keywords). To give them a bit more meaning, we use a naming convention for them to get a structured way of inventing scope names.
Oauth 2.0
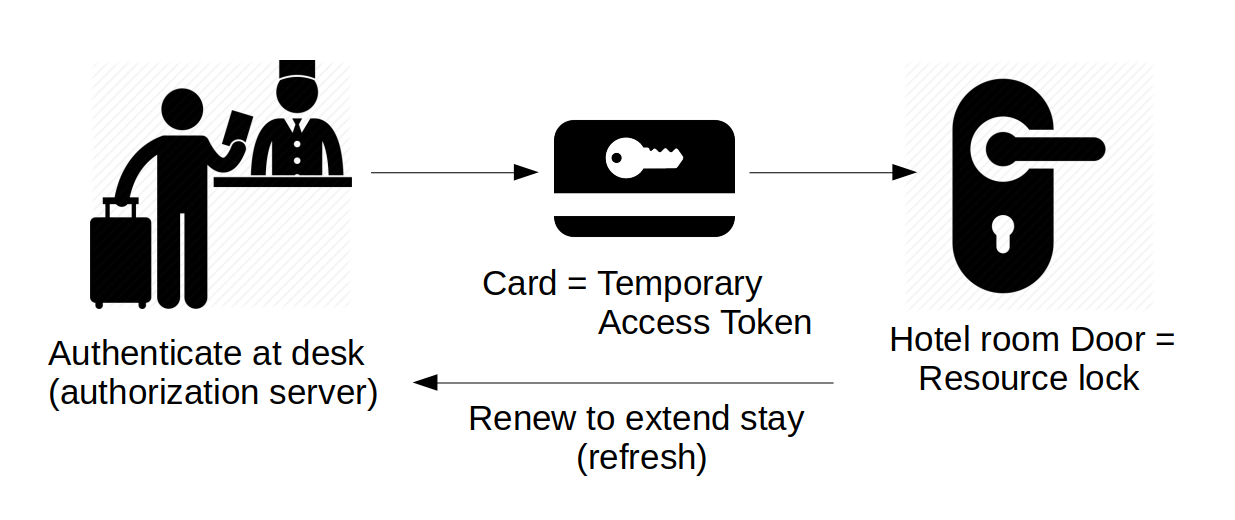
What is Oauth2? A Dutch Java User Group (NL-JUG) talk by Simone Stapels (in October 2019) about Oauth2 had a nice comparison. They looked at it as analog to a (modern) hotel. At the front desk, you ask for your key-card (you authenticate there, and the card is the token). The key-card can be used temporarily for your hotel room door (until the end of your stay). So the room is the resource you access using your key. Where the lock handles the authorization. If you want to extend your stay, you can renew the key at the front desk.
Oauth2 is similar. When you want to access a resource (for example a rest domain-service), you need a key. This key is called the access token, and is valid for a short time. You can ask an authorization server (our Identity Provider / IDP) for that access token, by authenticating yourself there. In some cases, with the access token you also get a refresh token. The refresh token allows you to get a new access token without going through the full (user-id/password) authentication with the IDP again. Refreshing is like a fast-lane for token renewal.
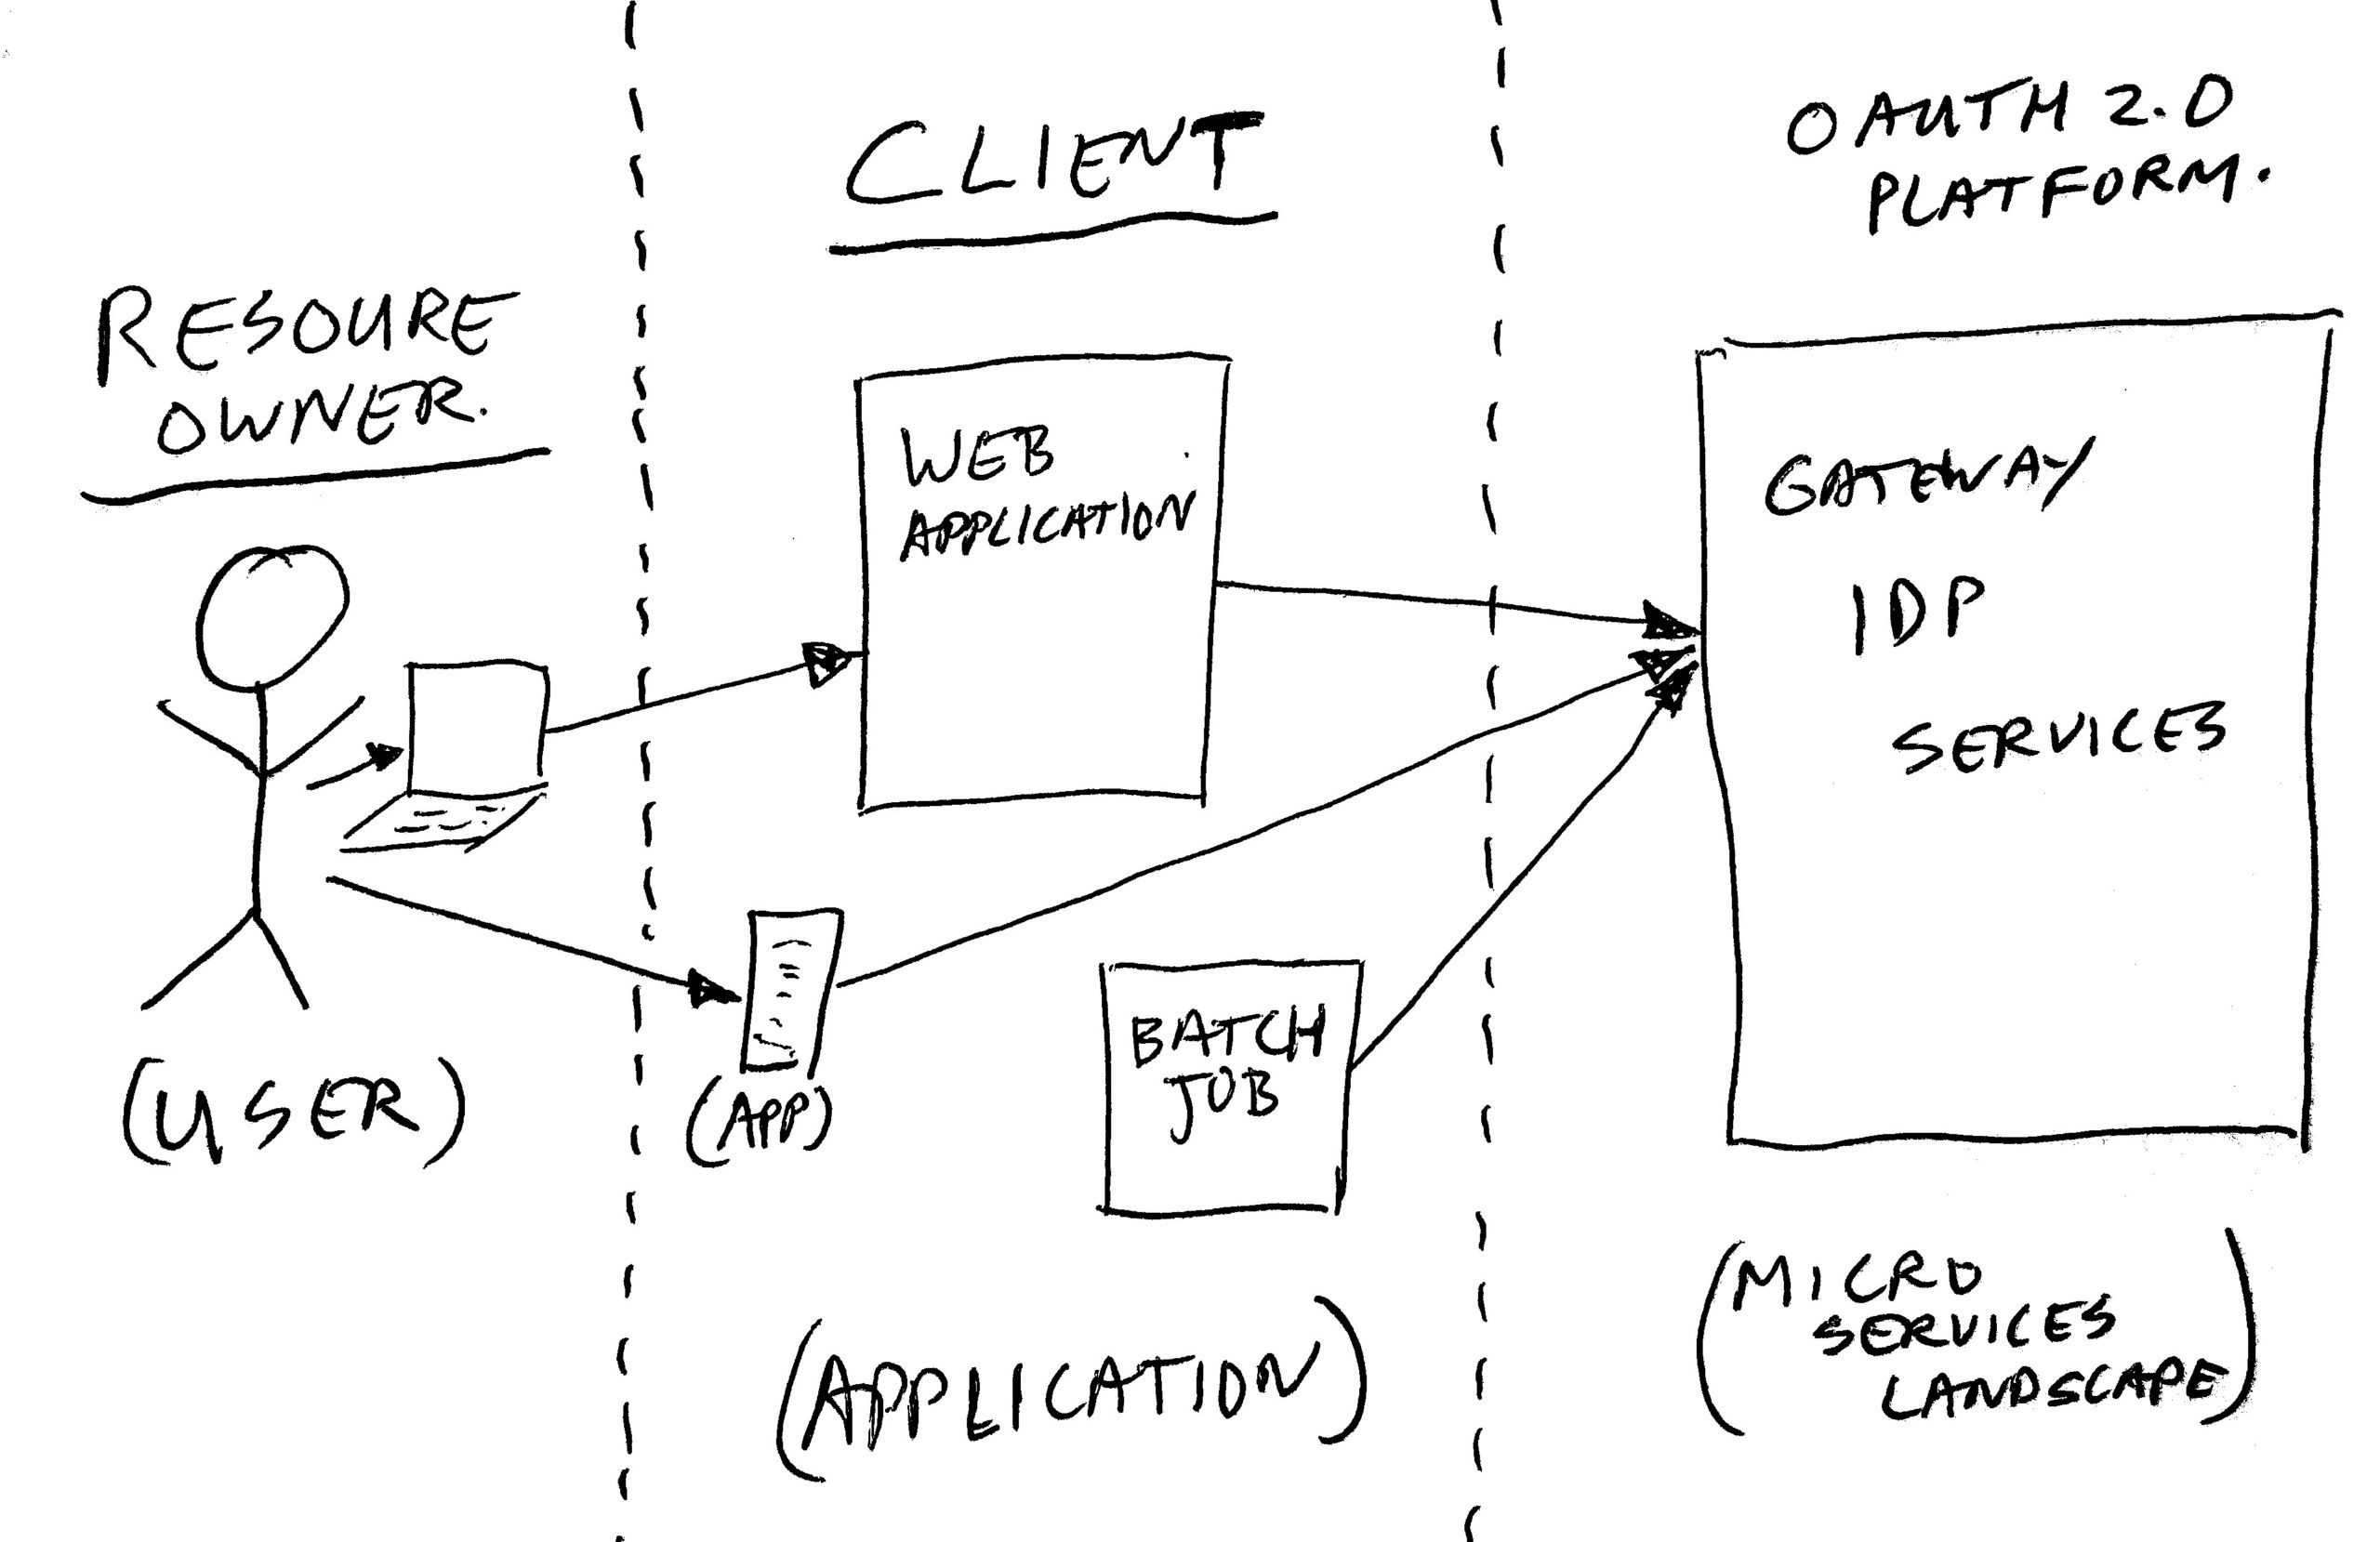
In Oauth2 you have different token types which are supported. You can get tokens for an application, which do not have personal authentication but just application authentication. Or you can get personal tokens, which need full user authentication (for example a user-id and password).
Client-Credentials Token
An application using Oauth2 is called an Oauth2 CLIENT, so we call the application token a client token (or client-credentials token). This is quite confusing; a client is not a person/user/customer, but many people think you are talking about a user if you talk about a client… REMEMBER: IN OAUTH2 – A CLIENT IS AN APPLICATION AND NOT A USER!
To create a client token (which has no information about the actual user), the application needs a client-id and a client-secret.
Using the id and secret, the application can simply ask the IDP for a token, which is done in a single round-trip request/response. In that same call, the application can also ask for a specific set of scopes to attach to the token. It is up to the IDP to determine which scopes are allowed for this client.
As said before, when an application has gotten hold of a client-credentials token, it can start executing service calls. The context of these calls do not pass on a specific end-user, so it is up to the services to determine what data may or may not be exposed.
Two examples:
- A public website – the web engine can use a client-token to query any public data from the services. For example all products which are for sale on a website. But it can not query order data of a specific order placed by someone. The scopes connected to the client-token will determine that only public data can be read.
- An invoice batch job – the job is an internal piece of code, for example triggered by time. The job can use a client-token with proper administration scopes to query and process orders for all end-users.
Resource-Owner Token
The personal (user specific) token in our system is called a member token by us, because our users are called members. I think in more official documents those ones are called resource-owner tokens. A resource-owner token will most of the time be created by passing on a user-id, a password, a client-id and client-secret in some way, but there can also be other ways to create one. One other way could be a trust relation with some other authentication system. And in our IDP we also created the option to exchange the access token from one client-id to an access token of another client-id, while retaining the resource-owner in context. We call this token federation, it’s basically a form of single-sign-on for us. But… this federation is not part of the Oauth2 standard.
Token Creation And Renewal
There are two ways of interacting to get a token; a purely machine-2-machine flow, and a machine-2-human-2-machine flow. The first one is called two-legged-oauth, and the second one is called three-legged-oauth.
For renewal of tokens we use the term token “refresh”.
Two Legged Oauth
This machine-2-machine form can be used both for getting a client (application) token, and for getting a resource-owner (user) token.
It is done by executing a simple HTTP POST request, passing on some values. And the response is either an access token (for client), or both an access token and a refresh token (for user).
Getting a Client Token (example)
Here is an example command line curl statement for getting a client token:
curl https://idp.somewhere.com/oauth/token -d grant_type=client_credentials -d client_id=someclient -d client_secret=somesecret -d scope="scope1 scope2"Code language: JavaScript (javascript)(Note: curl is a command line tool which sends HTTP requests. The -d options specify form fields to be put in a POST body).
The response could look like this:
{"access_token":"dc8b400d-d90e-4bbf-acb0-4ff53f34239b","token_type":"bearer","expires_in":3600,"scope":"scope1 scope2"}Code language: JSON / JSON with Comments (json)Getting a Resource-Owner Token (example)
Here is an example command line curl statement for getting a resource-owner token:
curl https://idp.somewhere.com/oauth/token -d grant_type=password -d client_id=someclient -d client_secret=somesecret -d scope="scope1 scope2" -d username=my@email.com -d password=somepasswordCode language: JavaScript (javascript)The response could look like this:
{"access_token":"268740a7-c843-4ddc-a354-62d8c8298846","token_type":"bearer","refresh_token":"211648ff-dac6-40b7-b193-e2bdc41cf958","expires_in":7199,"scope":"scope1 scope2"}Code language: JSON / JSON with Comments (json)Two-Legged Request Attributes
In above examples you see the following attributes in use:
- grant_type – the type of Oauth 2.0 request to execute:
- Value: “client_credentials” indicates to get an application/client access token. This type will never get a refresh token. This is because refreshing a token requires you to pass in the client-id and client-secret also. This would make it useless to also pass in a refresh token value, as you can also just request a new one with the initial token create call.
- Value: “password” indicates to get a resource owner access token, and if it is enabled for the used client-id in the IDP, you will also get a refresh token for this type (as shown in the example). We can also disable handing out refresh tokens, if they are not needed for the specific use-case.
- client_id – is the application id. Every application gets its own id. We configure in the IDP per client-id what scopes are available, what the expire duration’s are, and many other options for that application.
- client_secret – is the application password. This is a fixed password, for any token request the application wants to do. The idea is that the client_secret should never become publicly known. this means that if you build a mobile APP, that you should NOT put the secret in the app, as you can easily de-compile such an app, and find the used secret. Secrets should be stored server side, where a user can not reach it.
- scope – identifies which scopes you want for that token session. If you leave this blank (or leave the field off), in our case you will get ALL scopes available to the used client-id. Specifying a subset of the available scopes allows you to limit access in this token session. We always advice our application builders NOT to specify scopes. This way they automatically get any new scopes assigned to them.
- username – the user-id to get the resource owner access (and optional refresh) token for.
- password – the password of the resource owner.
A word of warning on using the password grant type: You can use this type for internal trusted applications, when this grant itself is not exposed to the internet. For example we use it in a web login screen which is presented to a customer, and the server under-water (internal call) uses the password grant type to request tokens for the user. The login screen uses a Captcha or 2-factor-authentication to limit bot hack attacks. That’s fine… But do NOT expose a call to the internet which can get an access token for any passed in user/password combination without having a captcha or 2-factor-authentication on it. The password grant type does not have the option for this extra protection layer. So just do not expose it. We can simply enable or disable the password grant-type per client-id in our IDP. Of course the password grant type in our IDP also has security measures where a number of failures will block the user account, or will block the used remote ip address. But not having a secondary security layer like Captcha or 2FA is not an option anymore nowadays. So… do not build a native mobile app login screen, which uses the password grant at the server for the login (yes, we initially did that… and learned the hard way… oops… massive attack… teardrop…).
Three-Legged Oauth
The machine-2-human-2-machine flow is called 3-legegd Oauth. This is because the flow starts at an application, passes control over to a login screen at the authorization provider (our IDP), and after user login it redirects back to the application with a code which can exchange the code for access and refresh tokens. This flow is only used for making resource-owner tokens. Not for client tokens.
You can use this flow from inside a mobile app by popping up a browser screen for the login flow, or embedding a border-less / inline browser inside the app. If we make the login screen look like the proper style, the user will not even notice that much that he is leaving the app. The app will need to monitor the browser window to pick up the end-login-redirect with the code, and take back control.
You can also use this flow from inside another website. You can present the user there with a login button, which will redirect to our IDP login screen. And the login will then redirect the user back after successful login (with the login code).
The reason for using the tree-legged login flow is two-fold;
- The application or website which uses this flow does never get the user’s password. That password is handled server side in our IPD. So the app or web builder does not have the possibility to look at random user data. The real user is the one who controls what data can be used in the app. The IDP offers the option to show a so called “grant” screen after the user log’s on, which will tell the user what data can be used on behalf of the app or website. The user can at that point choose to cancel the login, and not trust his/her data to the application. You might have seen this same thing on some sites if you use for example Facebook / GitHub / Google login to use another not affiliated site. The account holder site shows a grant screen in that case to show what data is shared, and asks if that’s OK.
- The second reason is for us (IDP / customer data owner) to be fully in control of the security measures during login. We protect the login using Captcha’s, and other abuse detection measures (and we will add 2-factor authentication also to this login). We keep the audit trails and block lists. And we can quickly change all of those security measures when we are under attack. It is impossible to get a new mobile app live quickly, and get rid of all the old app versions. It is not easy to get quick changes in third-party websites which use our IDP login also, but having them use three-legged login keeps us in control.
Three-Legged Login Flow (example)
The mobile app, or 3rd-party website starts the login flow by redirecting the user to an URL like this:
https://idp.somewhere.com/oauth/authorize?response_type=code&client_id=someclient&redirect_uri=https://original-caller.com/success&scope=scope1+scope2Code language: JavaScript (javascript)This will render a login screen, and optionally show a grant screen to let the user know what data will be shared or can be altered. After login and saying OK to the grants, the IDP will redirect back to the passed in “redirect_uri” location, with addition of a code attribute to that URL.
The code is a one-time usage code, which is valid for a couple of minutes only. The calling application must use that code to ask the IDP for an access and refresh token.
Example command line curl statement for exchanging the code:
# if above example ended in a redirect to:
# https://original-caller.com/success?code=4a505818-0733-4df3-b780-69af92dc65ac
# then execute a request like this to get the "real" tokens:

curl https://idp.somewhere.com/oauth/token -d grant_type=authorization_code -d client_id=someclient -d client_secret=somesecret -d redirect_uri=https://original-caller.com/success -d code=4a505818-0733-4df3-b780-69af92dc65acCode language: PHP (php)
The response could look like this:
{"access_token":"e2e6ec3b-f001-4786-8b8a-61a4bc4816f9","token_type":"bearer","refresh_token":a2e407a4-fce1-459d-b22f-7699b34fad74","expires_in":7199,"scope":"scope1 scope2"}Code language: JSON / JSON with Comments (json)Note: if you do or do not get a refresh token, is a configuration in the IDP for the used client-id. Depends on if we allow to refresh the token without asking the user to login again for that application.
Three-Legged Request Attributes
In above examples you see the following attributes in use:
- response_type=code – indicates we want a three-legged login, ending in a redirect back with a code.
- client_id – the application which wants to have a logged on user. Note that the initial browser login URL does only mention the id, and not the secret! We do not want the secret to get out in the open! And the login screen only needs the client_id to see for which application we execute the call.
- redirect_uri (in the start request) – indicates where to go after login+grant. The value can either be a URL pointing to the 3rd-part website where the user started, or it can be a pseudo URL, indicating to pass back control to a mobile app, for example: “the-app-name://login/success”. Note: this URL is mentioned in the start request, BUT… it is configured in the IDP client definitions also (as a list of possible URL’s), so you can not just change it to any value you like. This is to prevent a hacker from passing in a URL pointing to a hackers site, which then can exchange the code for tokens.
- scope – indicates which scopes we need to be attached to the token context. You can leave this off in our system to get all assigned scopes. As said before, we suggest to always leave this blank unless you really need it to limit possible user actions. The scopes have influence on what the user will see on the grant screen. By limiting the scopes, you will limit the access areas in the grant screen.
- grant_type=authorization_code – Oauth type which indicates that you want to exchange a code for tokens.
- client_secret – the application password, this is needed in the code exchange call to let us know this actually is the approved application requesting this. Note: never put this in a mobile app, the secret must live server side. This is in my opinion one of the shortcomings in Oauth 2.0. By moving this secret to the server, you basically allow anyone to execute this code exchange call. To move this, you need to build a server side proxy which adds the secret before passing the call on to IDP. Note: for the 3rd-part web case there is no issue. They can put the secret in their server, and exchange the code server side with us. The user will not see that call.
- redirect_uri (in the exchange request) – in the code exchange request, you MUST pass in the same redirect value as in the start request. The IDP will verify that both are the same. If not, it means someone has been messing with the data, and the request will be forbidden. The exchange call does not use the redirect_uri to pass back control to. It just responds with the tokens in a json object as shown in the example.
- code – the actual value of the one-time-short-lived login code. You get this code from the login success, and then can use it to get the proper access and refresh tokens in the exchange call.
An attribute not shown, but also allowed is “state”. You can pass in the state on the login page start URL, and you will get back the state value in the final code redirect. You can use the state for example to pass in some session context information, which you want to be reminded of on return.
Why would we not pass back the access and refresh tokens as result of the first login call? That would save you a request… Well, for starters, the original start URL does not have the client-secret, because we want to keep that secret. And that URL does show in your browser if you look at the right spot (developer network tab). And secondly, if we would pass back the tokens instead of the code, then the tokens will also be shown in the browser URL. And the tokens would end up in access logs on servers and proxies. We do not want anyone apart from the end user’s application to have those tokens. the code is not a problem, as that is one-time use only.
Token Refreshing
If one of the earlier shown resource-owner token flows gave you a refresh token, then you can try to renew the access token with it. This refresh does not need user-interaction like entering a password again. It is a simple machine-2-machine interaction.
Refreshing an access token will give you a new access and new refresh token. This will give you a new period of time to use the access token.
We normally advise to only refresh your access token, if it became invalid. You can see that when trying to use it, and you get a http status 401 as result. In theory you can refresh before expire, but for concurrent thread use this confuses the other threads, and in our implementation we have a form of token-re-use because of the massive amount of concurrent web threads, and this might lead to re-use of an existing token (or invalidation by another thread in that case).
The Oauht2 spec (RFC) is not clear about what should happen with the existing tokens, if you refresh one. Initially the used spring-security authorization server library immediately deleted the old refresh token when you executed a refresh. But when we tried using if-this-then-that (provide a service for it), they made us keep the old refresh token active for a short while, so we changed the code for that. And this actually also helps a lot when doing concurrent requests with the same token set. This way the concurrent requests can all execute the same refresh if they need to.
I should check our code, but I think we leave the old access tokens in-tact until they expire and get deleted by a cleanup batch job.
Note: we have done lots of customization’s to our IDP. One of these is that we have some client’s where you do get a refresh token, but it has a fixed end date/time. So you can refresh an access and refresh token with it, but the new refresh token does not have an extended expire time, but the same as the old refresh token. We use this to set a max duration for a login session.
Of course if a refresh token has gone past it’s expire date/time, you can not use it anymore. When trying, you get a http status 401 as result. In that case you know that the user needs to login again.
Token Refresh (example)
Example command line curl statement for refreshing the tokens:
# if you had a refresh token with value:
# ca6ff371-fb7f-4b9a-be3c-0eab8f935a42

curl https://idp.somewhere.com/oauth/token -d grant_type=refresh_token -d client_id=someclient -d client_secret=somesecret -d refresh_token=ca6ff371-fb7f-4b9a-be3c-0eab8f935a42Code language: PHP (php)
The response could look like this (same structure as for initial token create):
{"access_token":"b3e707a4-fce1-459d-b22f-7292b35fad73","token_type":"bearer","refresh_token":"a7e9ec3b-e121-4386-2b8c-92a4ba4815fa","expires_in":7199,"scope":"scope1 scope2"}Code language: JSON / JSON with Comments (json)And your application should then forget the old access and refresh tokens, and store the new pair for further use.
Refresh Request Attributes
In above example you see the following attributes in use:
- grant_type=refresh_token – Oauth type which indicates that you want to refresh the token pair.
- client_id – as seen before… application id.
- client_secret – as seen before… application password.
- refresh_token – the token indicating what token pair you want to refresh. You can not pass in an access token value here. It must be your refresh value.
An attribute not shown, but also allowed is “scope”. You can use that to narrow the set of scopes. You can not use it to widen the set of scopes. Not even if your client is allowed to use more than the narrowed set. You could use this to drop extra scope privileges by executing a refresh with less scopes than used initially.
Token Usage Flow Diagrams
With all shown information above, you can start using Oauth2 from an application. Here two flow diagrams to illustrate how you can implement this. This is under assumption that you use a gateway architecture like we do, to call services. And the gateway asks the IDP about the state of the tokens for each request.
Client Token Flow (to services via gateway)
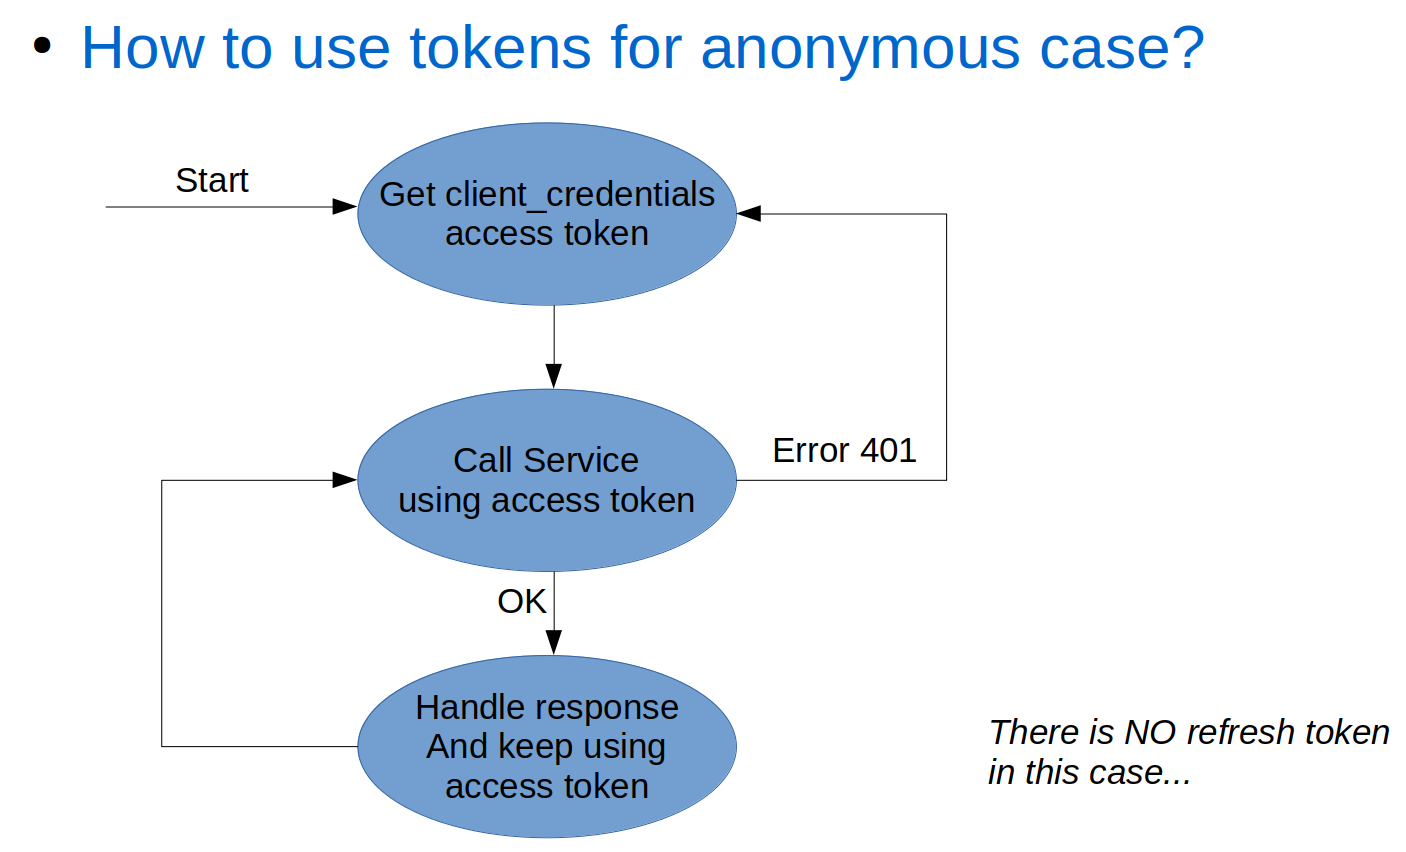
The client token flow is the simple one of the two flows. You get a token, keep using it until it expires, and if it expires, just get a new one.
Resource-Owner Token Flow (to services via gateway)
the resource-owner token flow (if you did get a refresh token) is a bit more complex. You get a token, for which you need the user-id and password. This first step can be done using two-legged or using three-legged Oauth as described earlier. Then you keep using the received tokens, until the access token is not valid anymore. When that happens, you try to refresh the token. If that worked, get back to the using flow. If that failed, you need to ask the user to login again.
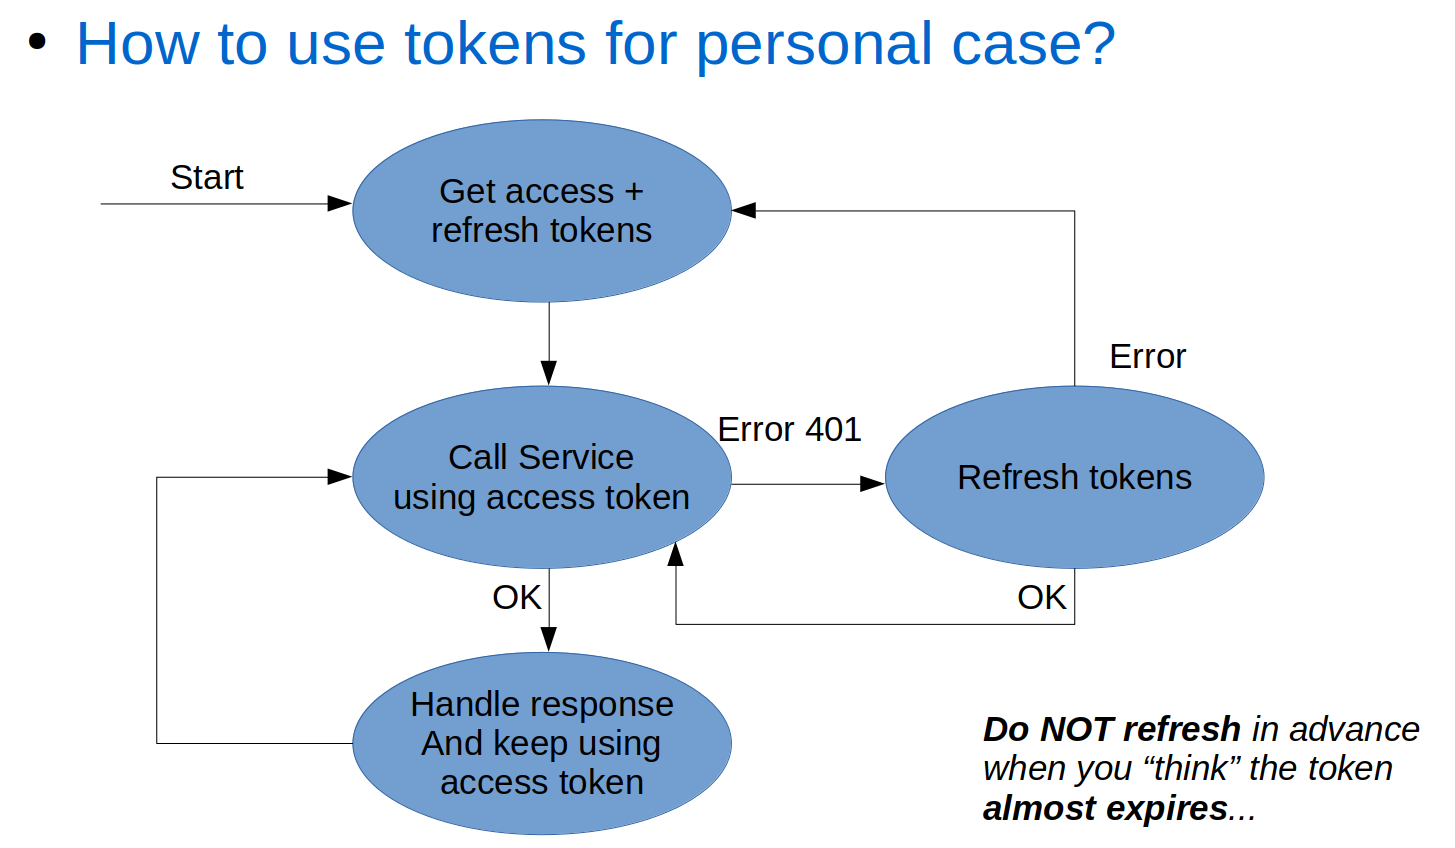
Please make sure you do not interpret the “expires_in” expire time you receive from IDP when requesting tokens. You might be tempted to use it to predict when a token gets invalidated, to for example pro-actively try refreshing before the actual expire. People on the project keep trying to do that again and again. But… this gives issues when executing concurrent requests with the same tokens, and the second reason you need to check on getting a 401 anyway instead of just doing a pro-active refresh, is that our IDP can decide to remove access tokens before they expire. We for example have a policy that only allows 8 tokens per user. Going over the 8 will get the oldest tokens removed.
Scopes
Now that we know how to create and maintain access and refresh tokens, we do want to give them meaning. Apart from the possible user context, the token context also contains the scopes as requested when creating the tokens.
Scopes are a group of “tags”, which indicate what kind of things you are allowed to do with the access token. Those things can be reading data, modifying data, and setting things in motion.
When we started building our open api landscape, we did not have rules on what those names should look like.
At some point in time, we came across the Slack-API specs (Slack; the team collaboration messaging platform). And they used quite a nice scope naming convention. So we adopted their way of naming scopes.
Scope Name Convention
In this scope name convention, a scope consists of up to 4 values, where two of them are optional:
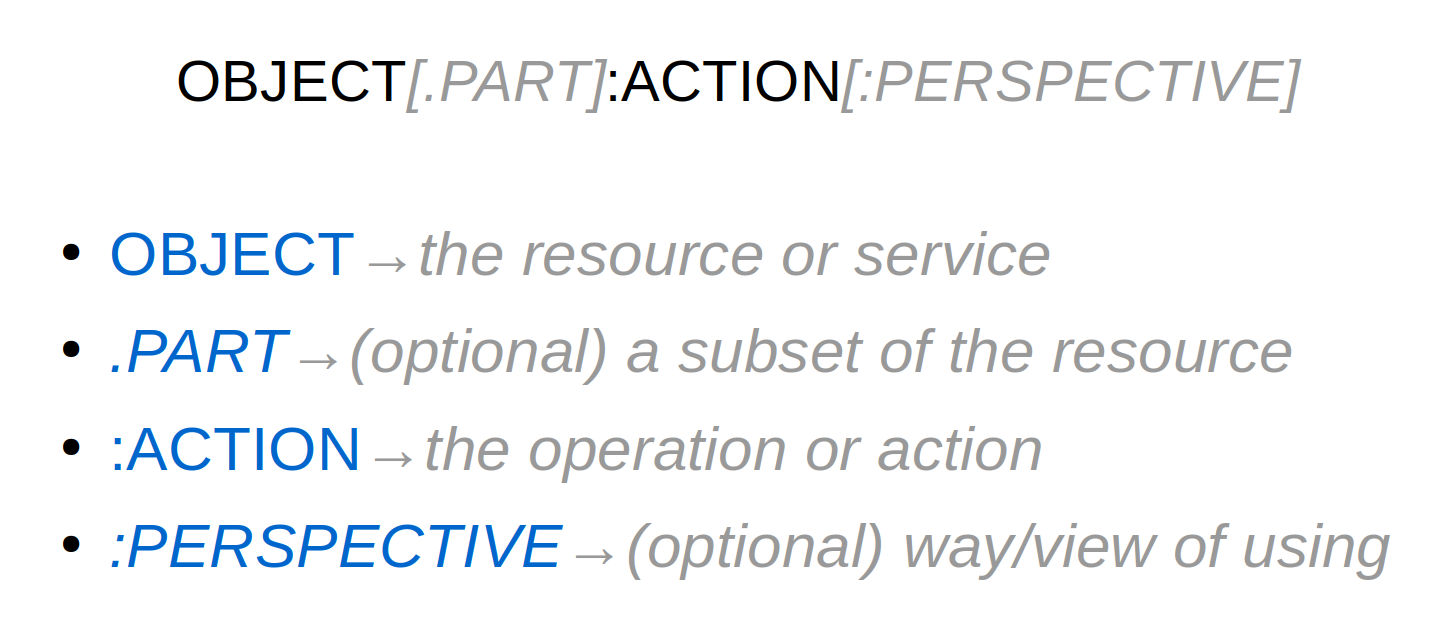
We always have the “object” and “action” values, separated by a colon. The “object” value indicates which resource or service this scope is about. The “action” specified what you can do with the “object”. Sometimes you want to make the “object” smaller, in which case you specify a “part” identifier. This is added with a dot separator after the object. And there are also cases where different kind of applications need the same “object”, but do need separate access rights. We call that the “perspective”, which is added at the end using another colon separator.
Scope Examples
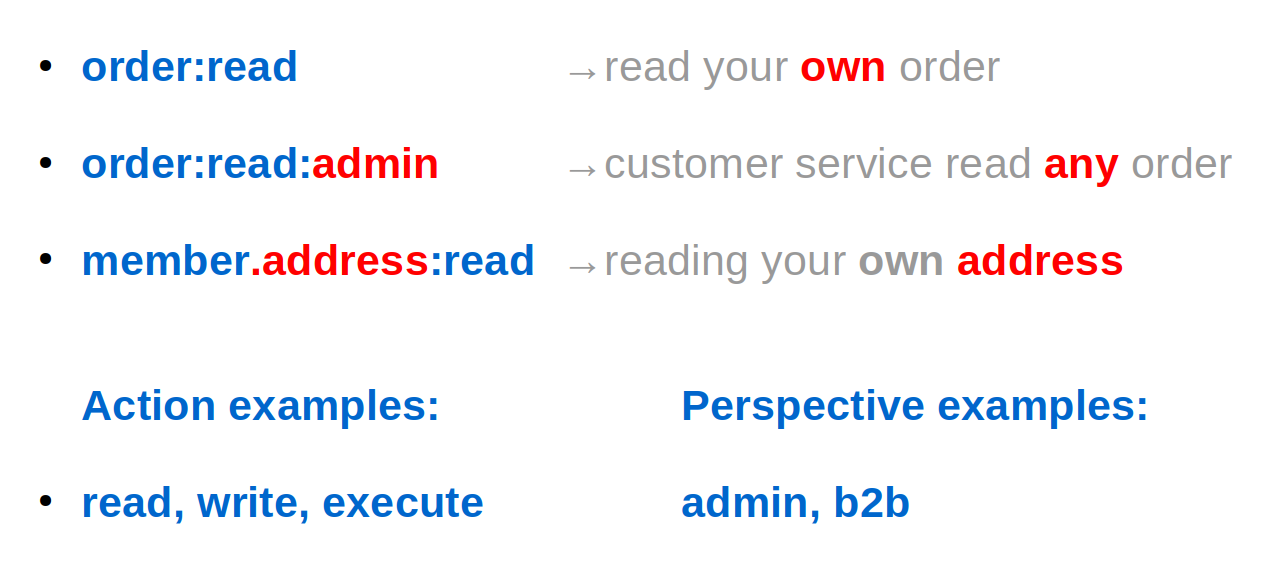
Most scopes in our system just use the two value version, like the shown “order:read” (and it’s counter part “order:write”). To just give the application access to resource-owner data for a single user.
And some services do use the more complex variants. For example batch jobs handling orders for all customers, or a customer care system where the help-desk employees need to be able to look at all customer data.
And we have some rare cases where there is a different view on data for “b2b” (business to business) or “b2c” (business to consumer) cases. That is, different sets of records, not different fields within those records.
Scope Enforcement
In our micro-services landscape we have two spots where we honor (or enforce) the different scopes. All traffic passes our gateway, and the gateway makes a first rough selection. We have mapping rules in the gateway, which identify for each context root path, which service will be called.
As extra attribute on those mappings, we specify a list of scopes as supported by the service. Whenever the used access token context has at least one of the listed scopes, then the gateway will pass on the request to the service.
Here’s an example gateway route mapping:
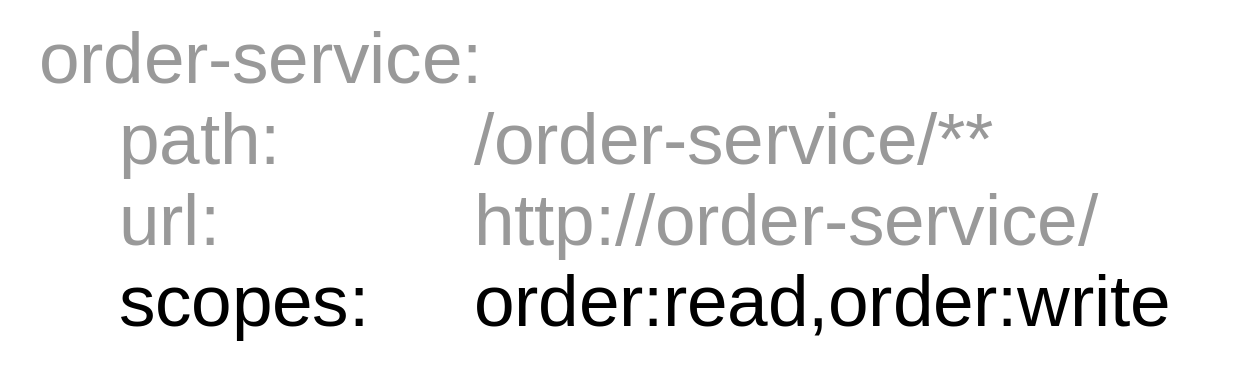
If the token has “order:read” and/or “order:write”, then you can call the service. The /** in the path indicates that you can call any sub-path on that service. If none of the scopes is in context, the gateway will send back a “forbidden” response. And not bother to call the service.
The next step is that the service it self will also check for the use of the right scopes, but this time fine-grained defined on each end-point. The scopes are send to the service in the JWT, and a security library put’s the scopes in the security context of our Java/Kotlin services.
Here is an example check in a piece of Java code:

This way, the service will return a “forbidden”, if the context did not contain that scope. There are more functions than just the “hasScope” we also have functions checking for more than one scope.
Apart from this, you can also just query the security context from within your service method, to find information on the resource-owner. Or in case multiple scopes match for a method, but you need to act differently on having or not having a certain scope. This way, when reading customer data, you can for example hide sensitive fields/attributes if a “.part” was specified in the scope.
Closing Thoughts
Here a bunch of related notes, not in any specific order:
For more details, there is a nice description of Oauth 2.0 in here: https://github.com/Kong/mashape-oauth/blob/master/FLOWS.md .
Especially look at the Oauth2 two-legged, Oauth2 three-legged, and Oauth2 refresh token sections. You can skip the Oauth 1.0 parts at the top of that document.
We used the spring-security authorization-server libraries for our IDP. These were a great starting point, and easy to extend with extra’s (like the federation and trusting other authentication systems). And changing the way refreshes work. See for more customization’s Part 3 – IDP.
The IDP has endpoints which are used by the gateway to check if an access token is valid, and to read token context in the form of a JWT. These are not described in this post. There is some clever caching in that code to check if the JWT has changed or not, to prevent generating JWT’s on each request. Of course we do need to query for token validity on each request. We can not cache that. So make sure to use a blazingly fast database for token storage.
Not mentioned above as grant-type, but there is also a thing called an “implicit” grant; Forget about this one! It is not considered the safest option. It sends back an access token as part of a redirect_url. We do not use this one. Data in URL’s tend to end up in access-logs, which makes this not safe. And it ends up in the browser address bar, which makes it possible for add-ons to have a look at it.
Take the note about not using the password grant type as public usable option really serious! Only use that internally to minimize public hack attempts. Use three-legged Oauth login for external mobile apps or external websites, and make sure to add Captcha or 2-factor-authentication to the login screen! Preferably 2FA, as Captcha is loosing it’s magic rapidly, due to advanced AI and click-farms.
Note: the shown paths https://idp.somewhere.com/oauth/token/** are made up, and just serve as an example. The correct URLs+paths depend on the actual IDP implementation.
As mentioned briefly in Part 1 – Overview, I do not think it is wise to use Oauth 2 for an internal website anymore, at least IF you have complex user states and these states need to be reflected end-to-end in Oauth. We have three user states; logged-on, returning-customer, and anonymous-user. For the first two, we use different Oauth client-id’s (with different scope sets), and separate access and refresh tokens. For the third, we use a client token. Whenever a web request is done, we potentially need to check all of these, and try refreshing or getting new tokens for each, if they are expired. And this happens in a massive concurrent way for the same tokens. Our website is in transition from consisting from several legacy monoliths moving to separate modern small web applications per part of the site. This means high complexity in all those parts. In the blog Overview part, I already hint at a possible alternative, on which I might go into more detail on in the upcoming part (#6) of this blog series. For a simple website, where a user is either anonymous, or logged on, you might get away with using Oauth2 in the site. Or if you use some other authentication between web and user, and just use Oauth2 from the web engine to back-end services (with a client token), it will also work OK. And of course for connecting 3rd parties and mobile apps, Oaut2 works good as well.
This post became quite big, so I’m wondering if anyone made it to the end (and did read it all). I hope this might help someone to make the right decisions when starting to use Oauth2 in their environment.
That’s it for part 4 of the series.
Thijs.
All parts of this series:
- Part 1 – Overview
- Part 2 – Gateway
- Part 3 – IDP
- Part 4 – Oauth2/Scopes
- Part 5 – From Legacy Monolith to Services
- Part 6 – Oauth2 and Web
One thought on “Micro-services Architecture with Oauth2 and JWT – Part 4 – Oauth2/Scopes”
Very nice post, thank you!